How to Enable Do Not Track in Chrome
You're tracked all over the Web, but sometimes asking politely will cause the behavior to stop. Do Not Track is built into most major web browsers, signaling to web sites that you don't want your browsing history logged by advertisers or publishers. All it takes to communicate your anti-tracking preference is checking a box, but the option is buried in Chrome's settings. Checking the box doesn't guarantee that any site will listen to your request (Google says it doesn't), but it can't hurt to make your voice heard.
Here's how to enable Do Not Track in Chrome:
1. Open Chrome.
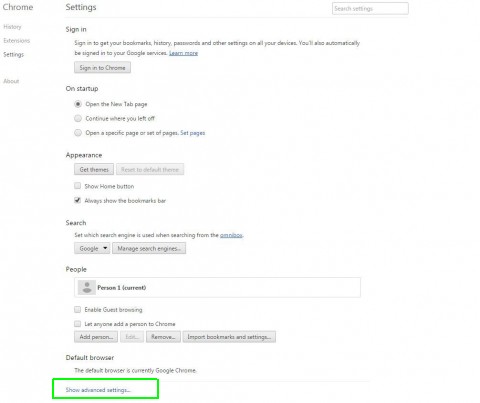
2. Type "chrome://settings" in the Omnibox.
3. Click "Show advanced settings" at the bottom.
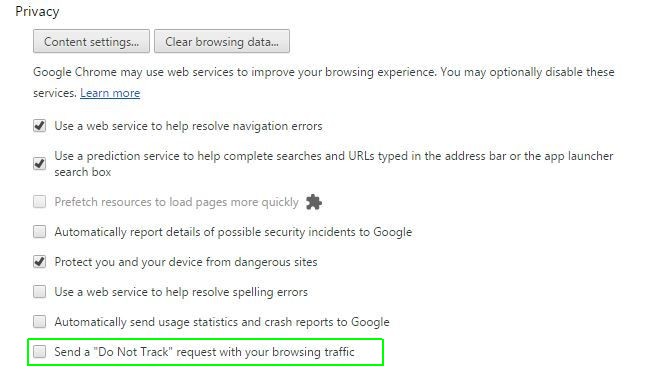
4. Click the Do No Not Track check box in the "Privacy" section.
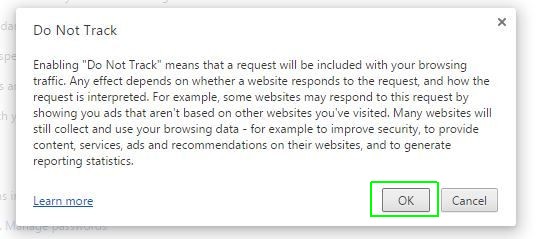
5. Click "OK" in the resulting pop-up.
Sign up to receive The Snapshot, a free special dispatch from Laptop Mag, in your inbox.
From here on out, you are sending Do Not Track requests when using Chrome. Sites you visit may or may not listen to the request, but your voice is heard.
Chrome Browser Tips
- How to Reduce Memory Usage in Chrome
- How to Silence Noisy Tabs in Chrome
- Hide Your Chrome Browsing From Your Boss
- Enable Guest Browsing in Chrome
- How to Make Chrome More Touch-Friendly
- How to Put Chrome in High Contrast Mode
- Remove Extensions from Chrome
- How to Resume an Interrupted Download in Chrome
- Protect Yourself from Spoilers with the Chrome Browser
- How to Create Desktop Shortcuts for Web Pages Using Chrome
- How to Use Chrome Extensions in Incognito Mode
- Disable (and Enable) Notifications in Chrome
- How to Use Chrome's Built-in Task Manager
- Add a Home Button to Chrome
- How to Change Your Default Search Engine in Chrome's Omnibox
- Show Frames Per Second in Chrome
- Get Gmail Notifications in Chrome
- How to Clear Your Internet History in Chrome
- How to Stop Pop-Ups in Chrome
- How to Prevent Scrollbar Jumping
- Change the Download Folder
- Firefox Quantum versus Chrome
Andrew is a contributing writer at Laptop Mag. His main focus lies in helpful how-to guides and laptop reviews, including Asus, Microsoft Surface, Samsung Chromebook, and Dell. He has also dabbled in peripherals, including webcams and docking stations. His work has also appeared in Tom's Hardware, Tom's Guide, PCMag, Kotaku, and Complex. He fondly remembers his first computer: a Gateway that still lives in a spare room in his parents' home, albeit without an internet connection. When he’s not writing about tech, you can find him playing video games, checking social media and waiting for the next Marvel movie.


