How to Increase the Text Size on Your Computer
Whether you've got a laptop with a tiny screen or a desktop with a giant monitor, your computer's fonts may be too small to read comfortably. Or, conversely, they could be larger than you need. Fortunately, you don't have to invest in a new pair of glasses. Whether you have a PC or a Mac, you can easily adjust the text size either for the entire operating system or just for particular parts of the interface. The methods vary based on your operating system and how much fiddling you want to do.
Change Text Size in Windows 10
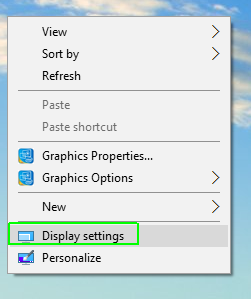
1. Right click on the desktop and select Display settings.
2. Slide the "Change the size of text, apps..." to the right to make text bigger. Or slide it to the left to make them smaller. The slider moves in increments of 25 percent. You can increase the size up to 175 percent.
You'll notice the size of text change right away, but you won't see everything get bigger (or smaller) until you reboot or log in and out. If you're happy with the text size, you can stop here. However, if you want to try custom scaling increments or adjust the font size of particular UI elements (ex: the title bars, the icons), continue with step 3.
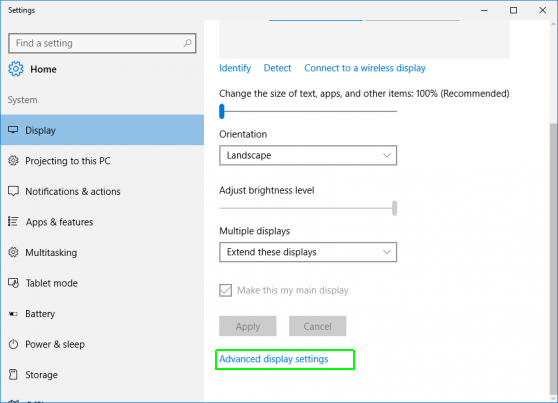
3. Click "Advanced Display Settings" at the bottom of the settings window.
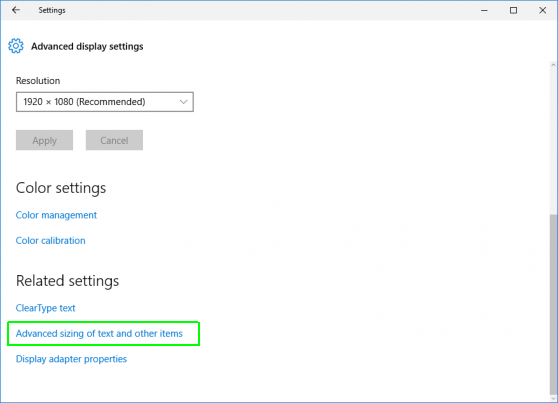
4. Click "Advanced sizing of text and other items" at the bottom of the window.
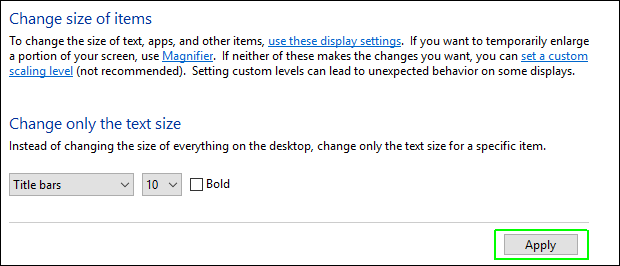
A screen with several display choices appears. From here you can choose to either A.) Set a custom scaling percentage (ex: 115 percent) or B.) Tweak the font size of specific elements such as the Menus and Icons.
Sign up to receive The Snapshot, a free special dispatch from Laptop Mag, in your inbox.
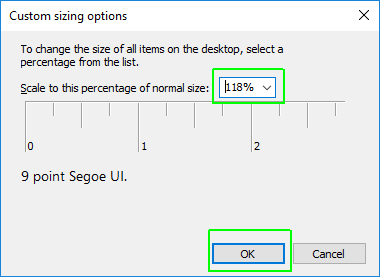
5a. Click "set a custom scaling level" under Change size of items.
A pop-up window appears with a little ruler in it. Click on the percentage box, type in a number and click Ok. Test out different sizes until you find one you like.
5b. Select the UI element you want to change, pick a font size and check "Bold" if you want the letters bolded. Repeat these steps as necessary for the Title bars, Menus, Message boxes, Palette titles, Icons and Tool tips.
6. Click Apply. Windows will either make you wait or ask you to sign out and sign back in (in the case of scaling) before you see the changes.
Change the Text Size in Windows 7
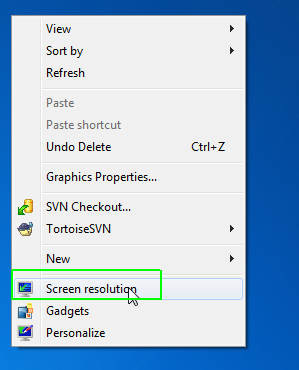
1. Right click on the desktop and select Screen Resolution.
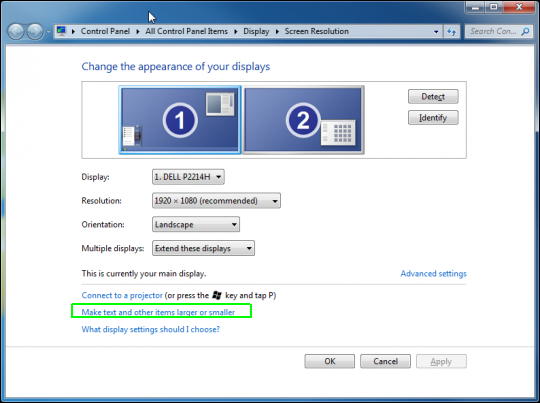
2. Click "Make text and other items larger or smaller"
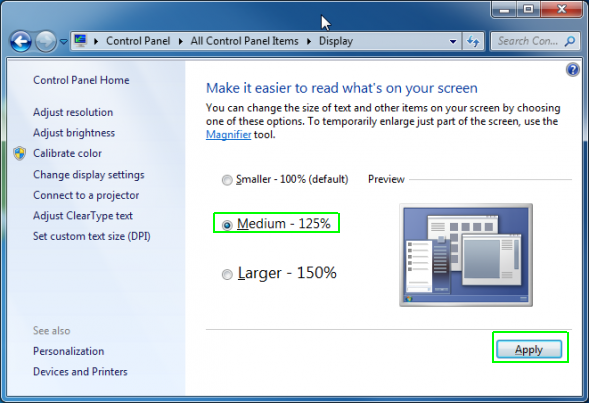
3. Select a percentage: Smaller, Medium or Larger (100, 125 or 150 percent) and click Apply.
4. Log off and on again (or restart the computer).
If you're happy with the results, stop here. If not, you can try to set a custom percentage.
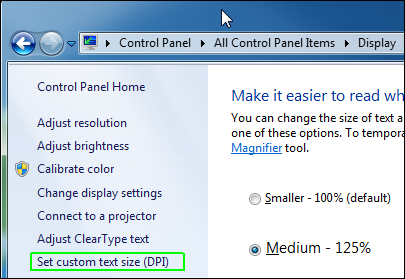
5. Click "Set custom text size (DPI)" in the left navigation after you've navigated back to the Display settings window.
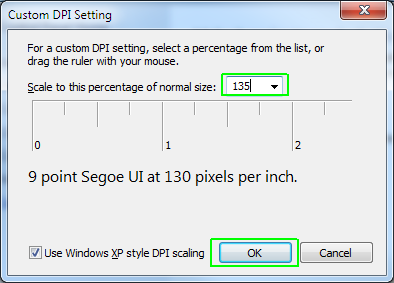
A pop-up window with a ruler appears.
6. Type a number into the percentage box (ex: 135 percent) and click Ok.
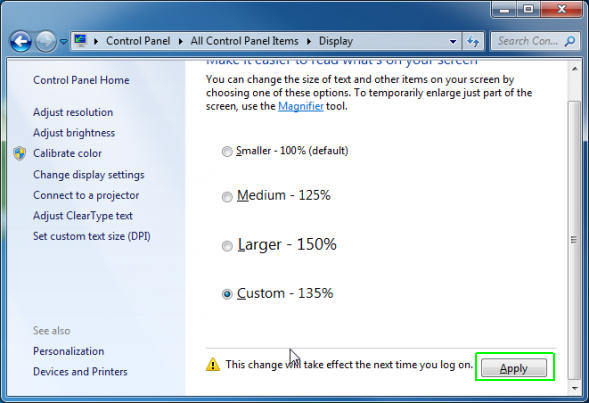
7. Click Apply on the next screen and then log on and log off.
Increase Text Size in Any Web Browser
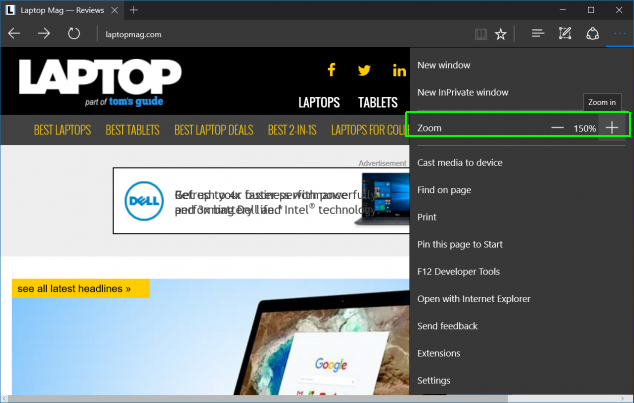
Hitting CTRL + in any of the major browsers -- Edge, IE, Chrome or Firefox -- will zoom in on a web page, making the text and images larger. Hitting Ctrl - zooms out. You can also select Zoom from the menu in any browser.
In Edge and Internet Explorer, the zoom level remains the same on every web page you visit. However, in Chrome and Firefox, the magnfication only remains constant within a domain so, if you zoom in on the home page of laptopmag.com and then go to tomsgiude.com, you'll need to zoom in again.
Permanently Increase Text Size in Chrome Browser
Chrome provides a way to either set a permanent zoom level or set a larger default font, which will make text larger, but keep graphics and other design elements at their normal sizes.
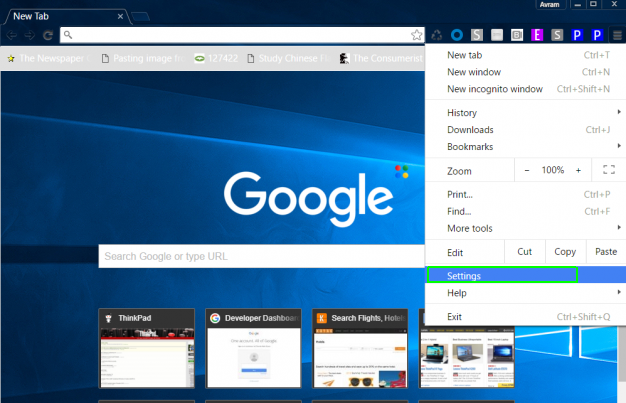
1. Select Settings from the menu.
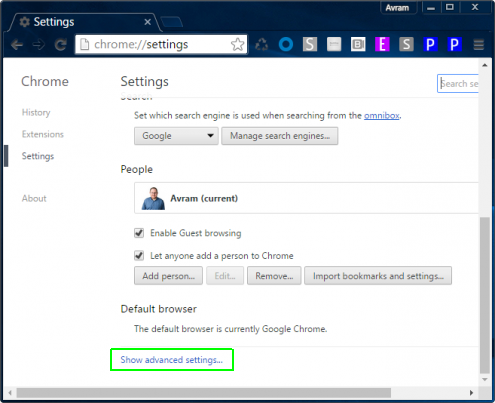
2. Click "Show Advanced Settings."
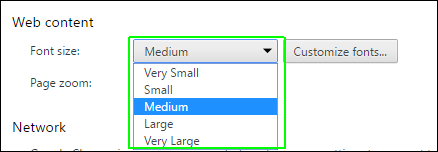
3. Select a font size if you just want to enlarge the text. Medium is the default size so pick Large or Very Large to make things bigger.
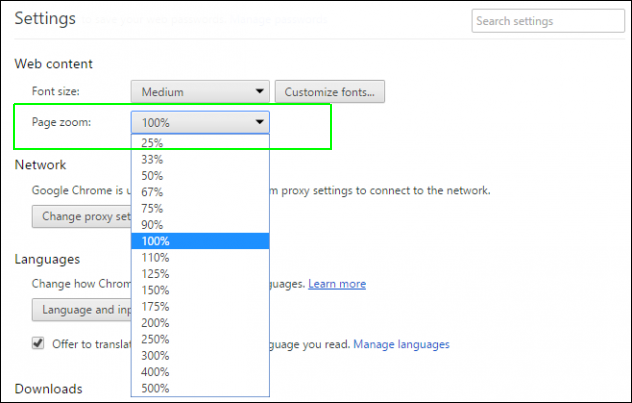
4. Choose a zoom level if you want to set an overall zoom for all aspect of every page, including graphics.
Increase Text Size on a Mac
There are several ways to increase the font size in Mac OS X. The simplest involves navigating to System Preferences->Displays, selecting the Scaled resolution option and picking a lower resolution than the default. See our step-by-step instructions for increasing the text size on Mac OS overall, changing the icon font size and enlarging the finder sidebar's font.
Customize Windows 10
- Create Custom Keyboard Shortcuts
- Make Windows 10 Look and Feel Like Windows 7
- Change the Default Windows Font
- Turn Off Notification and System Sounds
- Change Your Desktop Background in Windows 10
- Change the Icon Size
- Give Windows 10 a Dark Theme
- Make Your Own Windows 10 Theme
- Hide Your Name on the Login Screen
- Add Another Column to the Start Menu
- Get Mac-Like File Previews
- Add My Computer Icon to Desktop
- Edit Photos to Fit as Backgrounds
- Add Accent Colors
- Customize Autoplay Menu
- Install and Delete Fonts
- Customize the Action Center
- Disable Transparency Effects
- Get Classic Solitaire and Minesweeper
- Change the Look of Windows 10 Books
- Add a URL Field to the Taskbar
- Add Clocks from Multiple Time Zones
- Get the Old Volume Control Back
- Disable Windows 10 Startup Delay
- Add Quick Contacts to the Start Menu
- Show Hidden Files and Folders
- Enable Spatial Sound
- Best Themes
- All Windows 10 Tips
- Change the Login Screen Background
- Install New Desktop Themes

