Sign up to receive The Snapshot, a free special dispatch from Laptop Mag, in your inbox.
You are now subscribed
Your newsletter sign-up was successful
Whether you bought a Fire tablet just for your child to use, or you want to be able to hand your own Fire to your child once in a while, a Child Profile is essential for keeping kids away from your media, apps, and settings.
It’s also great for sharing select media with a child, or sharing one Kindle Fire with multiple children of different ages. Creating a Child Profile is easy and can be done in just a minute or two. Once the profile is set up, if you want to, you can go deeper into the settings and get very specific.
Initial Setup
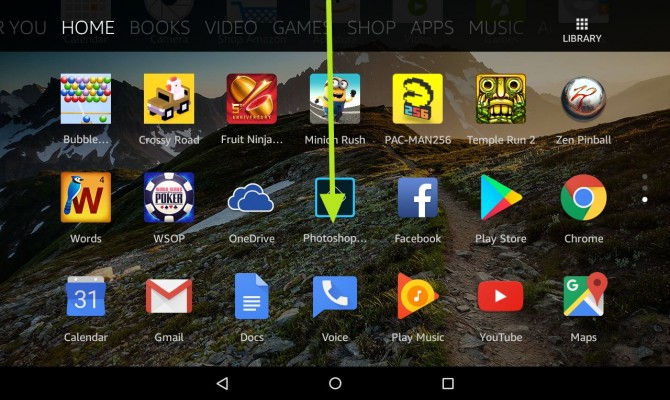
1. Swipe down from the top of the Fire’s screen.
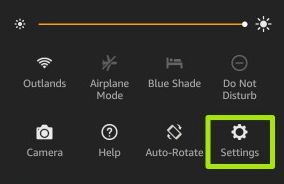
2. Press Settings.
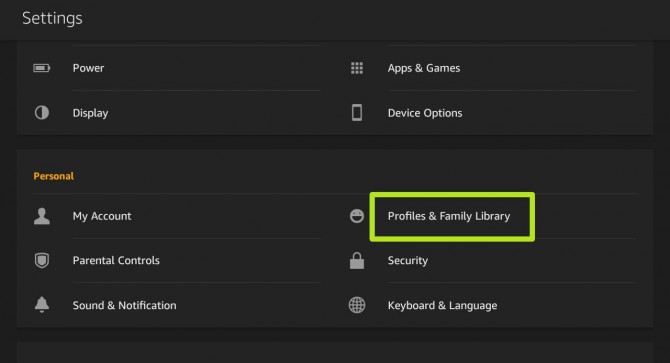
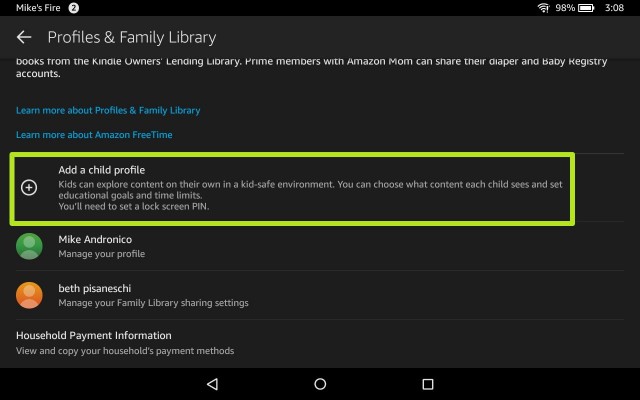
3. Scroll down to the “Personal” section and press Profiles & Family Library.
4. Press Add a child profile.
Sign up to receive The Snapshot, a free special dispatch from Laptop Mag, in your inbox.
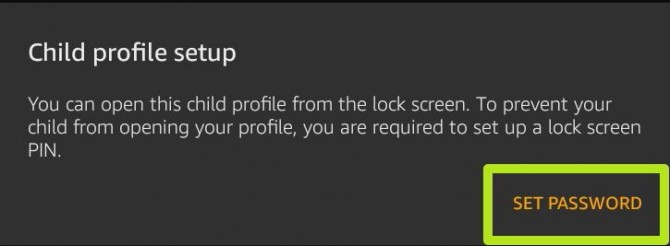
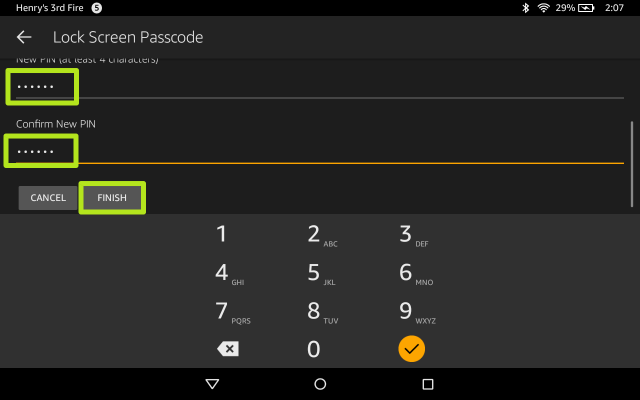
5. Note that if you don’t already have a lockscreen passcode set up for your profile, you will be prompted to set one up. This is so your kids can't use your account.
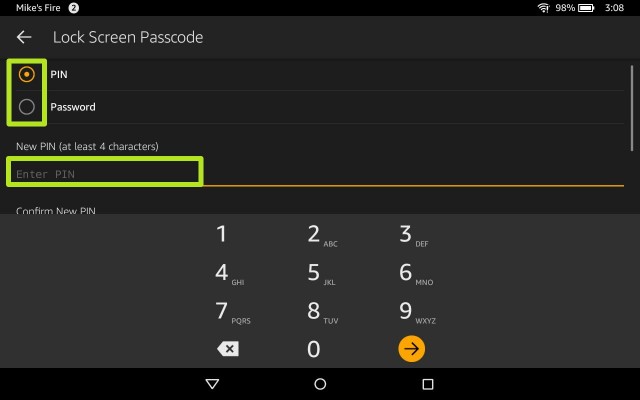
6. Select PIN or Password,
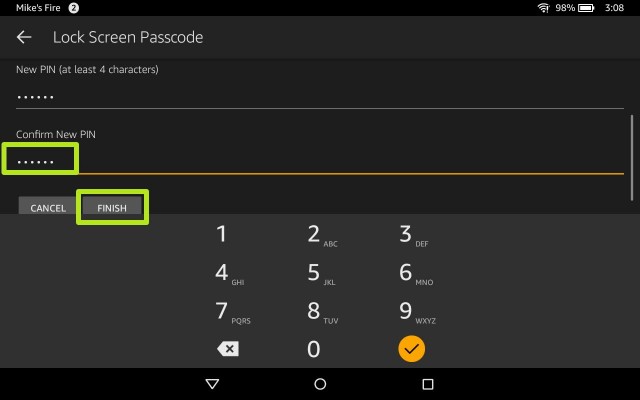
7. Re-enter the PIN or Password, and tap Finish.
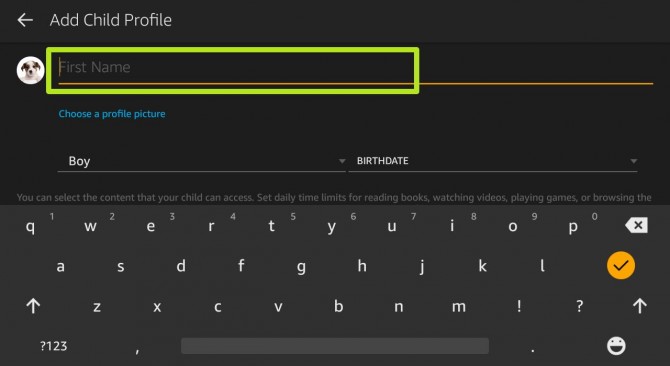
8. Enter the child’s first name where prompted. Press Choose a profile picture if you would like to do that at this time.
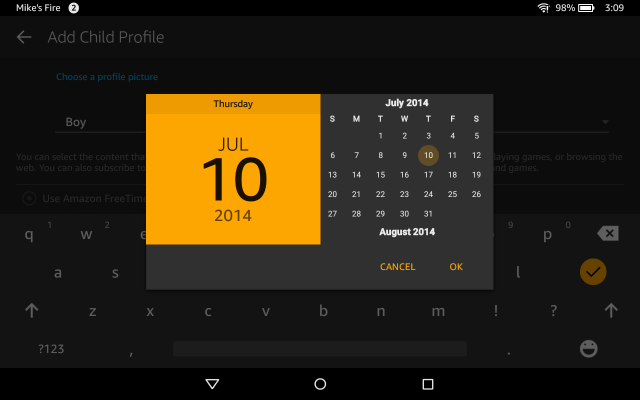
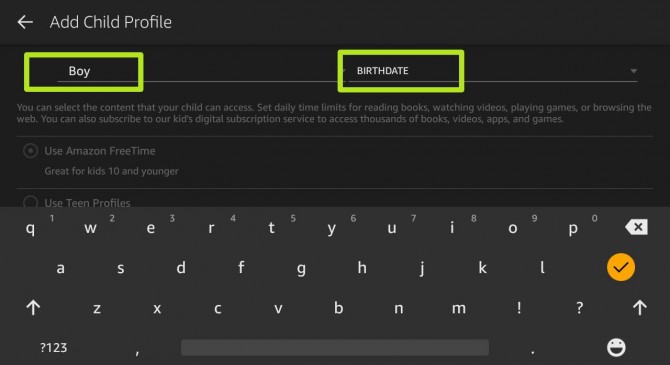
9. Tap Boy to select a gender and tap Birthdate to enter their date of birth.
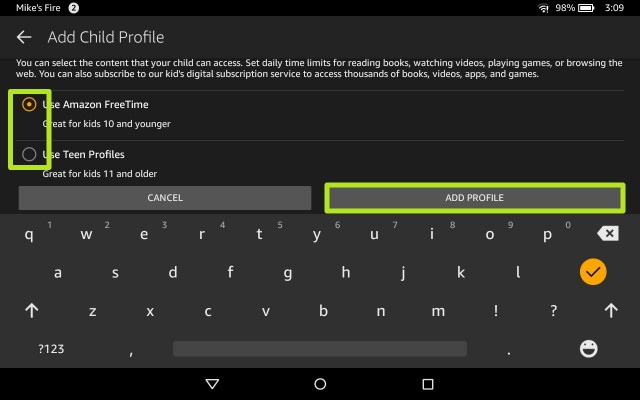
10. Choose either Use Amazon FreeTime or Use Teen Profiles, and then tap Add Profile. The Fire will preselect one for you based on the child’s birth date, but you can change it. (Teen Profiles have a less child-like look, but you will still have access to the same settings.)
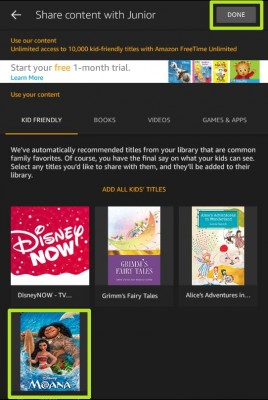
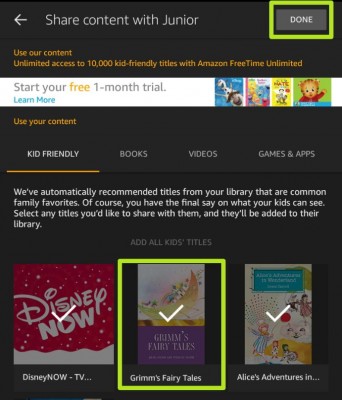
11. You will then be taken to a screen that lets you add content from your own collection to that profile. Tap Done when you're finished. The first tab is labeled Kid Friendly. This is the Amazon content you already own that is designated as appropriate for children. You can click on Add All Kids’ Titles or click on individual titles. You can also click on the other tabs (Books, Videos, and Games & Apps) and choose individual titles. Titles with a check mark will be accessible from the child’s profile.
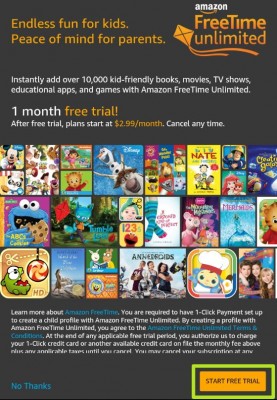
12. If you're not already a member, you'll get a prompt to sign up for FreeTime Unlimited, which starts at $2.99 per month after a 1 month free trial. Select Start Free Trial or No Thanks.
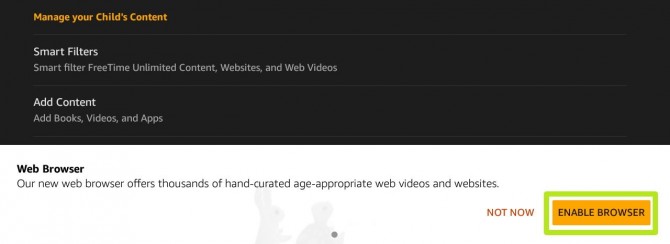
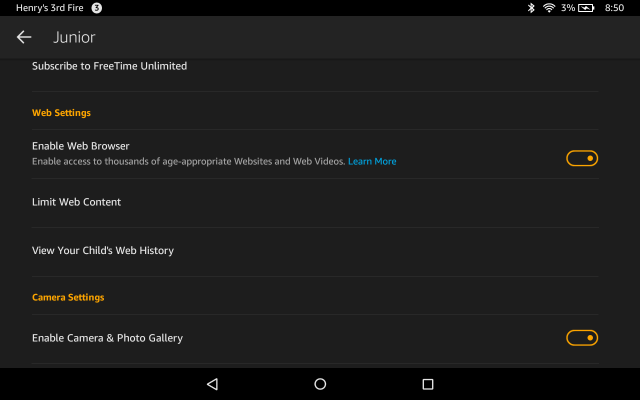
13. Tap Enable Browser to get the FreeTime Web Browser, which only lets kids view content that Amazon believes to be age-appropriate.
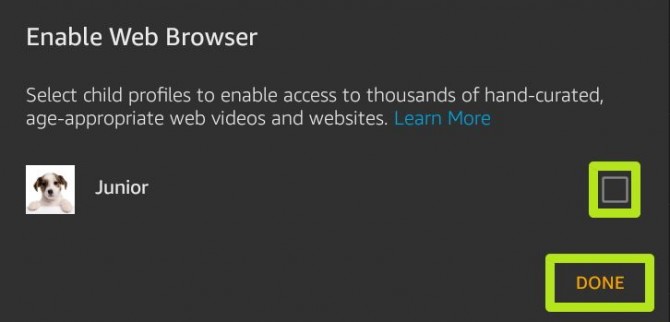
14. Check the boxes next to child profiles to give browser access rights, and tap Done.
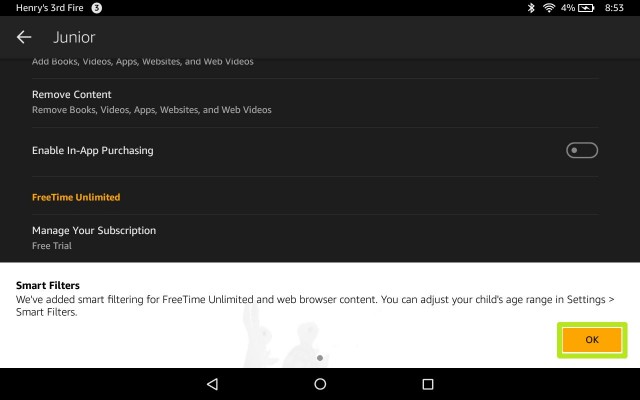
15. Tap OK to recognize that the Fire tablet uses filters to decide which web pages and FreeTime Unlimited content is appropriate.
16. The child profile is now ready to be used. You can turn the Enable Web Browser switch off to take this privilege away from your child.
The rest of the settings can be accessed from the child’s profile settings screen. Swipe down from the top of the Kindle Fire’s home screen and press Settings. Scroll down to the Personal section and press Profiles & Family Library. Press the profile that you’d like to manage to access the following settings. Note that if you are already in the child’s profile, swiping down and pressing Settings will get you to that profile’s passcode-protected settings screen – you do not need to go back to your own profile.
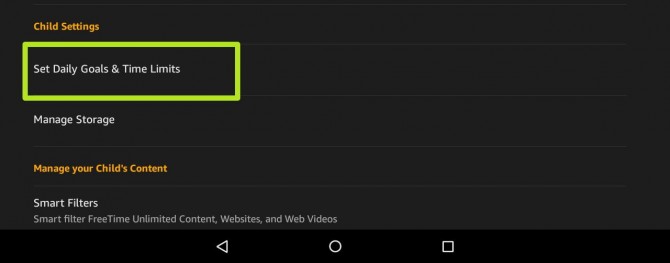
Child Settings
1. Press Set Daily Goals & Time Limits (if Daily Goals & Time Limits is set to off, move slider to the right to turn on).
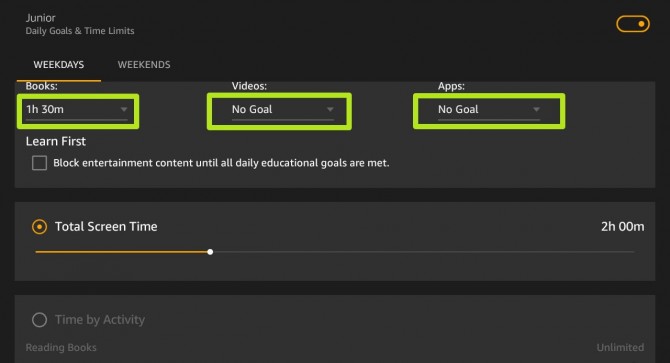
2. Set bedtime times, which regulate the window of time this profile will not be accessible during. Tabs at the top are used to move between settings for Weekdays and Weekends.
3. Set Education Goals for your child to meet each day. If you check the Learn First box, your child will not be able to access other content on the Fire until these goals are met. For the purpose of these goals, Amazon labels individual videos, apps, and games as either “educational” or “entertainment.” All books are labeled as “educational,” and all web browsing is labeled as “entertainment.”
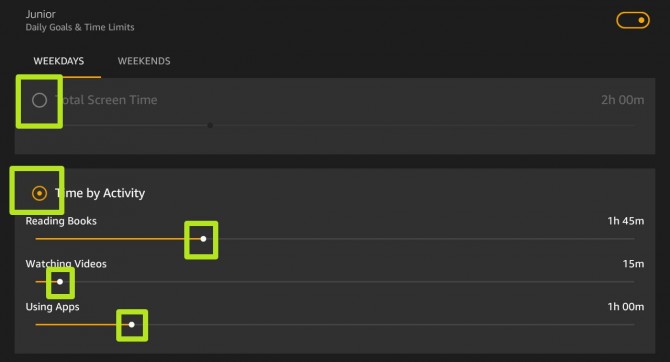
4. Select Total Screen Time, or Time by Activity, to decide how you want to limit usage. If you choose Time by Activity, you'll break the allotment down by books, videos and apps.
If you don’t want to set a screen time limit, choose Total Screen Time and drag the slider all the way to the right, until it says “Unlimited."
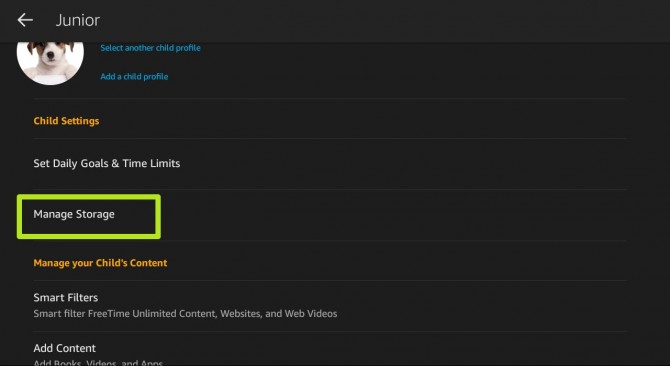
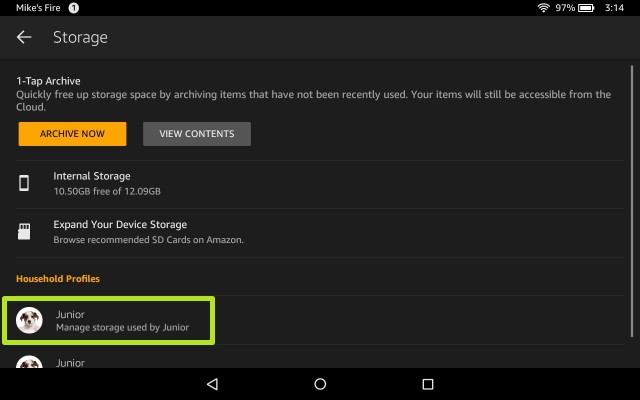
5. Press Manage Storage to see how much storage is free on your device.
6. If your kid's data is taking up too much space, tap on their profile to clear its data. If you’re running low on storage, press Archive Now to free up space. To see what is available for archiving, press View Contents. To see how your storage is being used, press either Internal Storage or (if you have one installed) the SD card.
Manage your Child’s Content
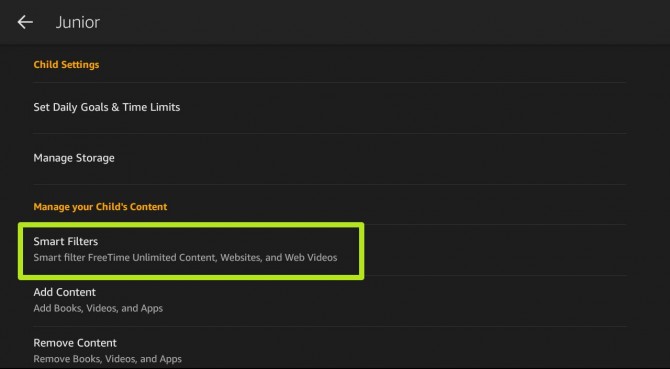
1. Press Smart Filters.
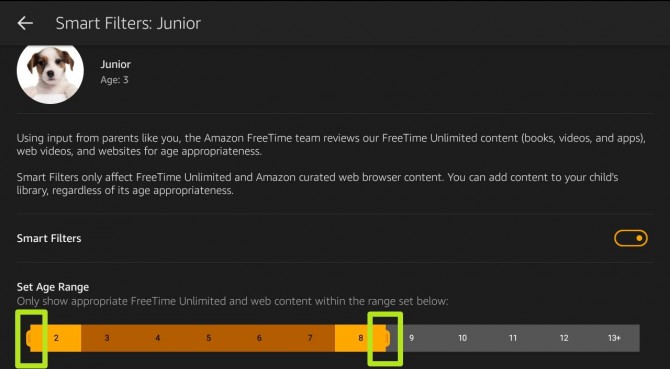
2. Drag both ends of the age range slider to determine what FreeTime Unlimited content and websites your child has access to. (These filters do not affect titles that you’ve added to your child’s profile from your own library.) Move the left and right sides of the filter slider to highlight the ages of the content you would like included on the child’s profile. As you move the slider you can see examples of appropriate titles under the slider.
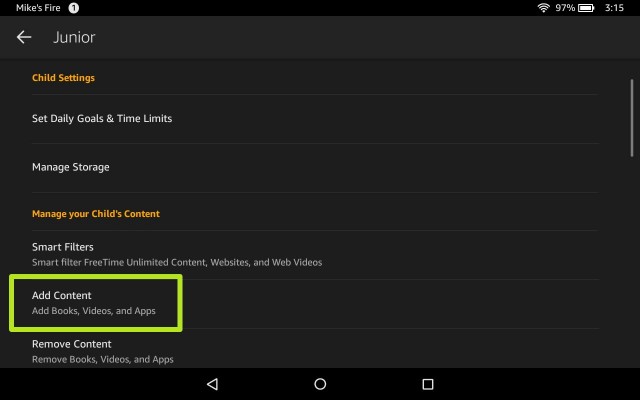
3. Press Add Content.
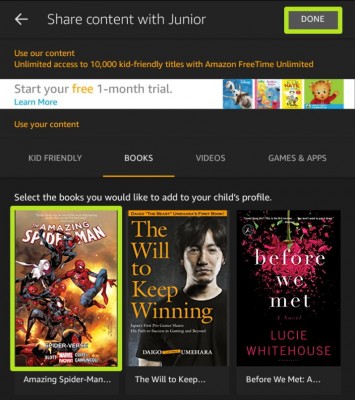
4. Here, choose the tab of the content you would like to add (Kid Friendly, Books, Videos, Games & Apps), and select content from your library to share with your child. If you have enabled the web browser there will be addition choices that will be discussed in the Web Settings section below. For Books, Videos, or Games & Apps, press each title to toggle the check mark – titles with a check mark will be included in the child’s profile. Press Done to save any changes.
5. If you would like to remove content, press Remove Content.
6. Choose content to remove, and tap Done.
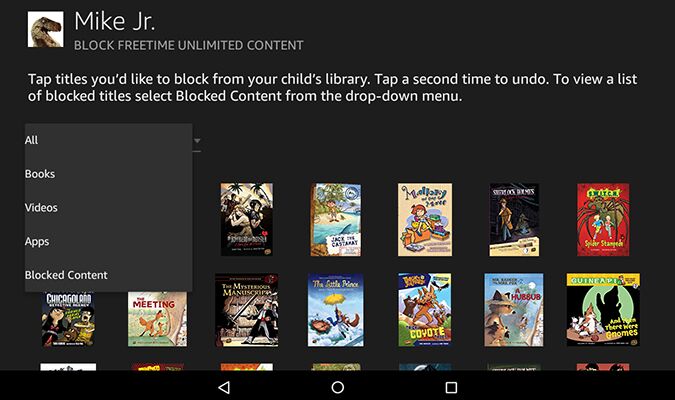
7. Unwanted FreeTime Unlimited items can be removed by searching for individual titles that you want to block, or by browsing through all available items (there is a dropdown to enable browsing by Books, Videos, or Apps, or to see a list of blocked content). Pressing an individual title will block it (there will be a lock icon in front of it), and pressing it again will make it available to the child’s profile (no lock icon).
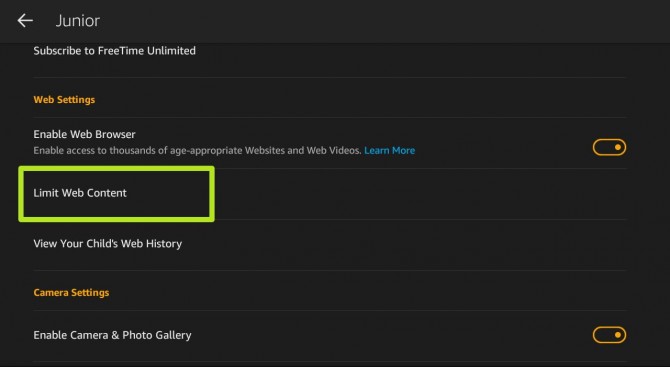
8. If you have enabled the Web Browser you can tap Limit Web Content.
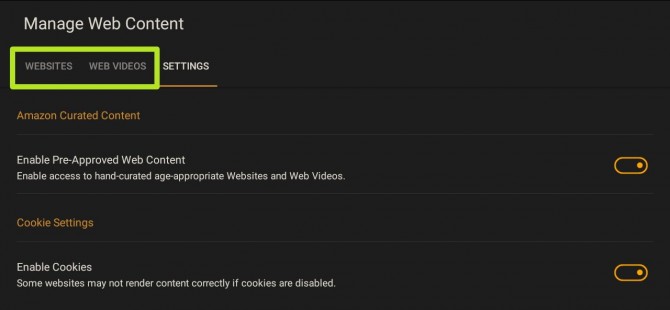
9. Then, choose either Websites or Web Videos, where you manage the content available to this profile. Here, you can also turn off activity-tracking Cookies, and disable or enable Amazon's web curation.
10. Press the + sign.
11. Enter a web address or the name of a video if you're adding web video.
12. Tap Allow.
13. Tap Done to move on, or next to add another.
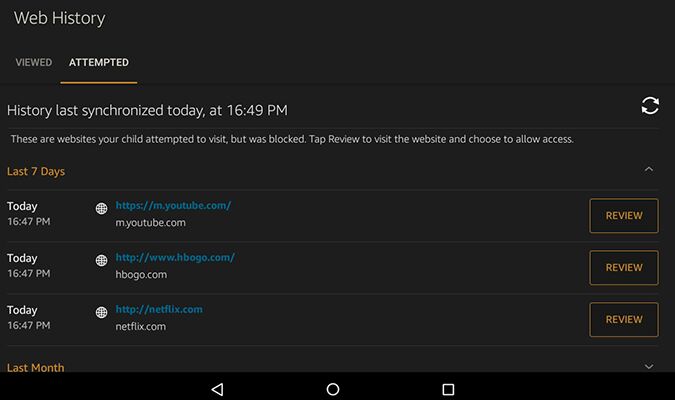
14. Press View Your Child’s Web History to see a complete list of every website and video your child visited or attempted to visit. (If “History has not been synchronized” is displayed, press the circular arrows to the right.)
15. Press either the Visited tab or the Attempted tab, and then press Review to check out the website in question; while there you can choose to Allow or Block it.
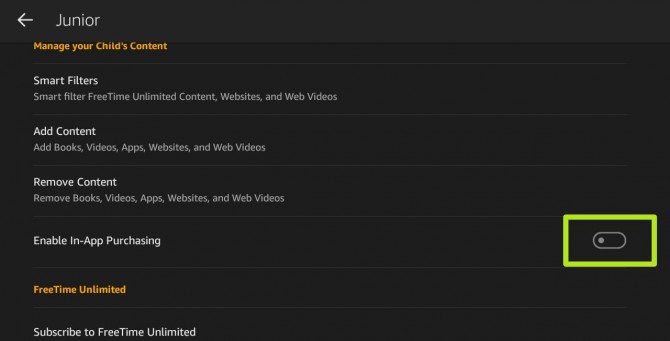
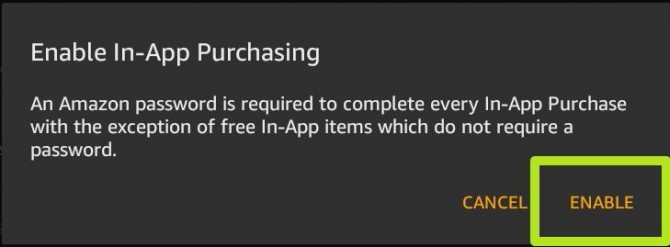
16. If you would like your child to be able to make in-app purchases, move the slider to the right next to Enable In-App Purchasing. Even with this setting turned on, your child will still need the Amazon account’s password in order to make an in-app purchase. If you do not already have 1-click Ordering set up on your Amazon account, you will be prompted to do so.
FreeTime Unlimited
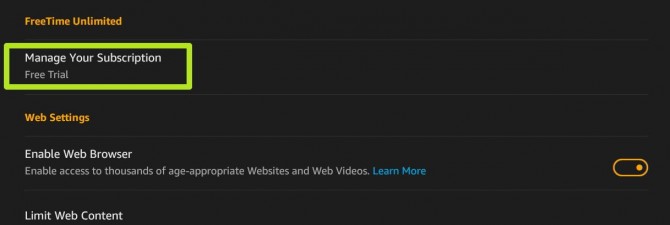
If you have a FreeTime Unlimited subscription, you can choose which child profiles have access to the content.
1. Press Manage Your Subscription.
2. Manage Your Plan.
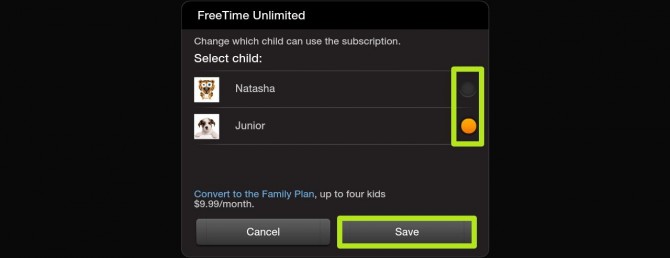
3. Check the boxes for the child profiles that you would like to have access to the FreeTime Unlimited content, and press Save.
Camera Settings
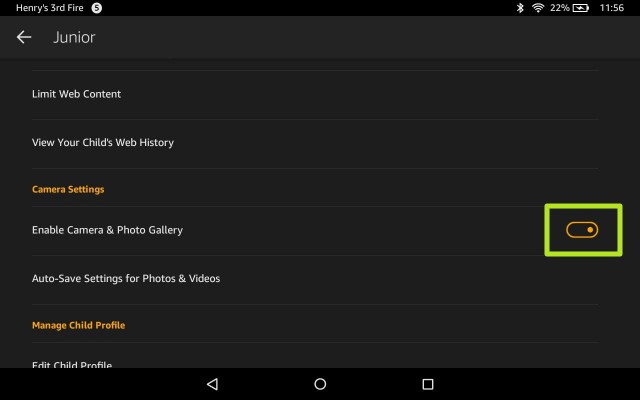
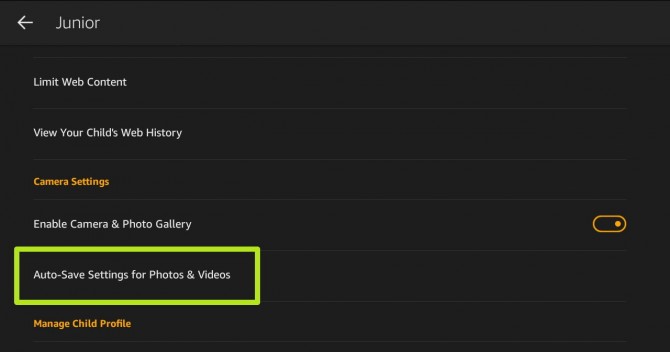
1. To turn camera access off and on for an account, toggle the switch next to Enable Camera & Photo Gallery.
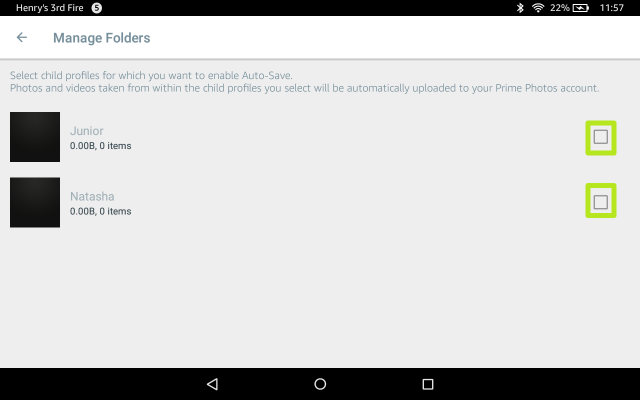
2. To change the Prime Photos storage settings, press Auto-Save Settings for Photos & Videos.
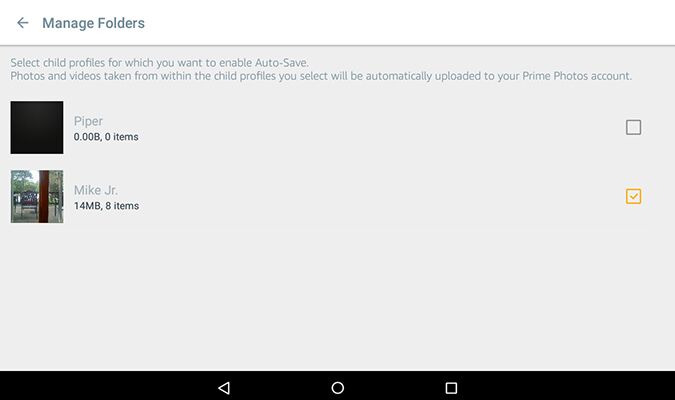
3. Check the box next to each child’s profile whose camera images you would like to automatically save to the cloud.
Manage Child Profile
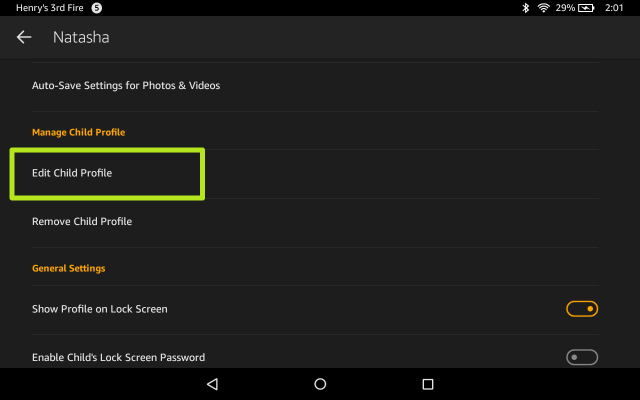
1. Press Edit Child Profile to change the basic settings from the first steps of setting up a Child Profile. You can change the name, gender, birthday, and profile picture, or switch profile type (FreeTime or Teen)
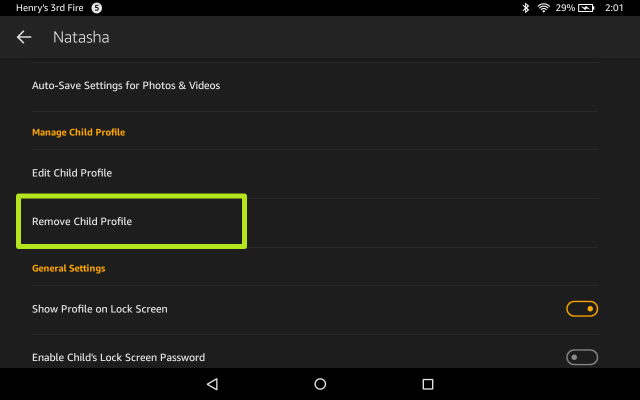
2. Press Remove Child Profile ONLY if you want to completely remove a child from the Fire.
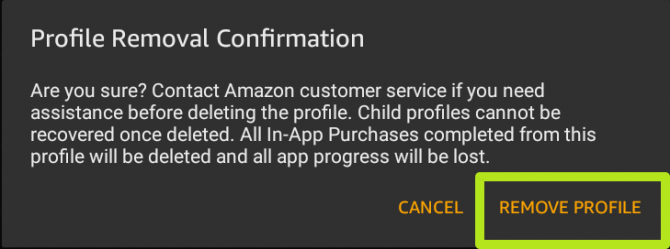
3. Tap Remove Profile to confirm.
General Settings
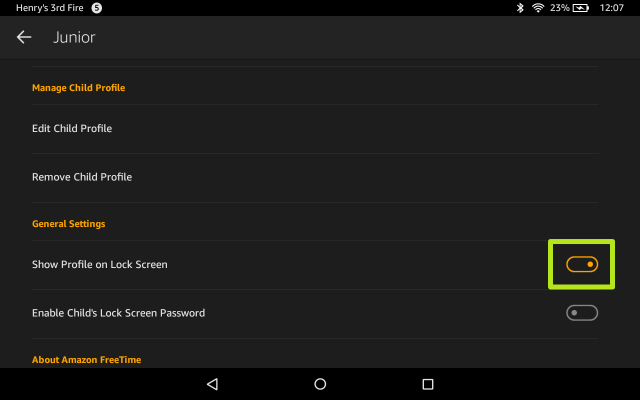
1. If you would like to temporarily hide a child’s profile from the lock screen (meaning that the child will not be able to use the profile), move the slider to the left next to Show Profile on Lock Screen.
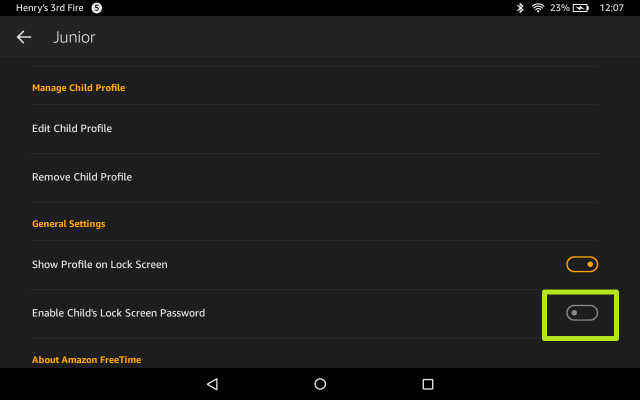
2. You will still be to see the child’s profile in the settings, and can turn the profile back on at any time. Pressing Enable Child’s Lock Screen Password will allow you to set up a PIN or Password for a child’s profile.
3. This can be useful if more than one child shares a Fire and you don’t want them to be able to access each other’s profiles. Enter the PIN or Password, enter it again to confirm, and press Finish.
Amazon Fire Tablet Tips
- How To Sideload Apps On Your Fire Tablet
- Get Google Play On Your Fire Tablet
- Create A Child Profile On Your Fire Tablet
- Configure Parental Controls On Your Fire Tablet
- How to Stop Amazon In-App Purchases
- Get the Nook App on Kindle Fire
- Clear Cookies and Browsing History on an Amazon Fire Tablet
- How to Turn Off Ads on Amazon Fire Tablets
- How to Use Alexa on a Fire Tablet
