Microsoft provides two distinct options to capture the screen using bundled tools. The first, and oldest, is the PrtScr button on the keyboard, a tool that requires copying an image and pasting it into Paint to edit. It’s not ideal, and lacks the features of the newer version: Snipping Tool.
While a giant leap forward for screenshots on Windows devices, even Snipping Tool falls short in one key area that I’d never knew I needed, until I actually needed it; I couldn’t capture the mouse cursor. Here’s the roundabout fix I came up with so that I can get that pesky mouse cursor in the image, when required. Of course, you can also use third-party tools to do the same thing -- or record the screen, cursor included -- but for me, this isn’t something I’ll need that often.
- Best laptop 2022: 21 laptops for every use case and budget
- Best cheap laptops in 2022
- The best laptop deals available right now
How to include the mouse cursor in a Windows 10 screenshot
1) Type "Steps recorder" in the Search box in the Taskbar.
Article continues below2) Select "Steps Recorder" from the search options.

3) In the recording menu bar, click "Start Record." Step recorder will capture all user actions after this point.

4) Click "Stop Record." A page with all recorded steps will appear.
5) Scroll down to find the screenshot you need.
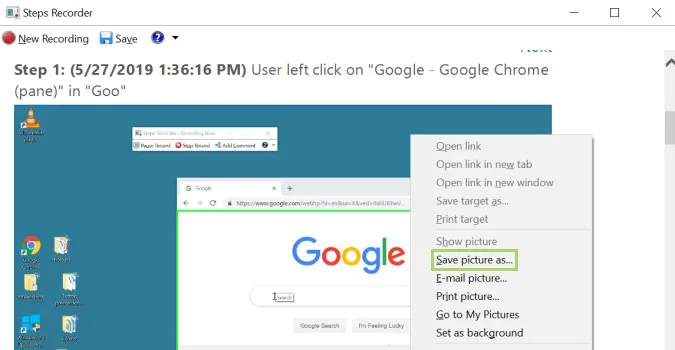
6) Right-click on the screenshot to open the context menu.
7) Click "Save picture as" to save the screenshot.

8) Type a file name in the File name field.
9) Click "save."

10) Click X in the upper right corner to close the Steps Recorder.
That's it, the saved screenshot will include your mouse cursor.
