How to Use PowerPoint 2013 Smart Guides to Align Images and Text
Sign up to receive The Snapshot, a free special dispatch from Laptop Mag, in your inbox.
You are now subscribed
Your newsletter sign-up was successful
In PowerPoint 2010, you had to eye your slide layout on the fly, trying to line up images and text based on your estimation. With Microsoft's PowerPoint 2013, the Smart Guides feature lets you be exact. Here's how to make sure you're perfectly aligned.
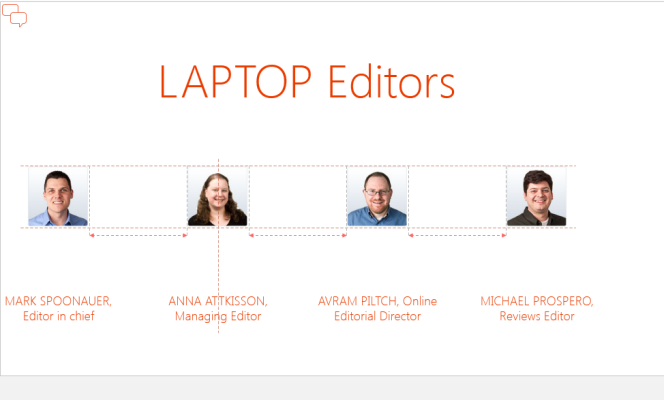
1. Click to drag an image or text near another image or text. The Smart Guides dotted lines appear automatically showing when you’re aligned with other images or text.
2. Use the equidistant guide to evenly space out several images or text. This guide will automatically appear when you click and drag to move images or text around (you'll see dotted lines with arrows on the end; that indicates that your graphic or text is evenly spaced with those around it).
3. Click and drag an image around until you see a vertical dotted line appear down the center of the picture. This will align text to be perfectly centered above or below an image.
More PowerPoint 2013 Tips:
- How to Customize Your PowerPoint Presentation
- How to Use PowerPoint's Presenter View
- How to Use PowerPoint's Slide Zoom
- How to Collaborate Using PowerPoint
- How to Integrate Multimedia Into PowerPoint
- How to Merge Shapes in PowerPoint
- How to Add Audio to PowerPoint
- How to Use PowerPoint's Eyedropper Tool
- How to Present a PowerPoint Presentation Online
Sign up to receive The Snapshot, a free special dispatch from Laptop Mag, in your inbox.


