12 Useful iPhoto for iOS Tips [Video]
Sign up to receive The Snapshot, a free special dispatch from Laptop Mag, in your inbox.
You are now subscribed
Your newsletter sign-up was successful
Now that it’s vacation season, you’re going to want to nail down an efficient method for editing all the photos you’ve been taking on your summer trips. In the past, this might have meant lugging around your laptop. Now, that’s unnecessary. Arm yourself with an iPad and the official iPhoto app ($4.99), and execute the same pro-level effects with a few simple swipes and taps on your tablet.
See iPhoto in action:
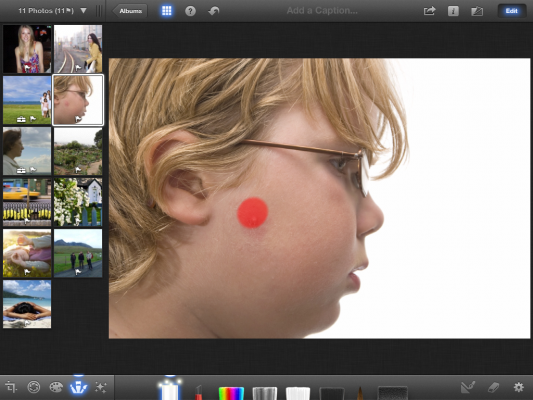
It is possible to remove acne and other skin imperfections with iPhoto with the Repair brush. Below you’ll see this process in action. You can find 12 more iPhoto tips after the jump.
Article continues below1. Crop a photo
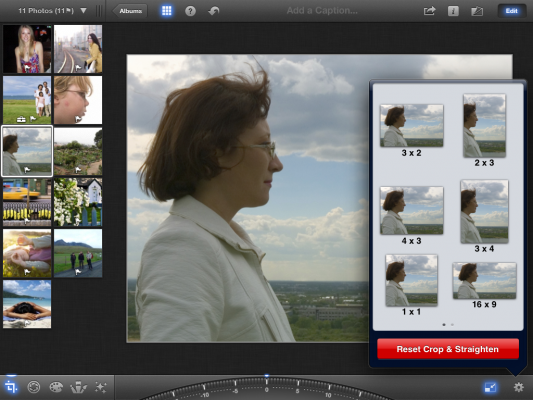
- Select a photo and tap Crop, the first icon in the lower left menu. (Alternatively, tap the Edit button in the upper right.)
- Touch the image to crop it. Twist your fingers to rotate the photo freehand, pick up the crop handle by its edges, or pinch to zoom the image itself and adjust what fits in the frame. Or touch the digital dial along the bottom edge of the app to rotate the image with more precision.
Bonus tips:
- Tap the Gear icon on the lower right to crop the image automatically using the aspect ratio of your choice.
- Tap the Lock Aspect Ratio icon (beside the Gear icon) to crop the photo while keeping the aspect ratio of the original photo.
2. Color-correct images
- Select a photo and tap Color (the third icon in the shape of a palette in the lower left).
- Touch the part of the image that you want to adjust. IPhoto automatically senses if you’re touching blue skies, skin tones or greenery, and lets you drag your finger horizontally (left and right) across the screen to tweak these color controls.
- Touch anywhere on the image and drag your finger to adjust saturation. Drag up to boost saturation and down to desaturate the photo.
Bonus tips:
Sign up to receive The Snapshot, a free special dispatch from Laptop Mag, in your inbox.
- Tap the “WB” icon on the lower right to apply preset color adjustments such as “Cloudy,” “Incandescent,” and “Sun.”
- Tap the Gear icon and toggle Preserve Skin Tones to maintain the natural skin colors while boosting others
3. Remove red-eye
- Select a photo and tap Brushes, the fourth icon in the lower left. A fan of art tools springs up from the bottom edge of the screen.
- Touch the Red Eye brush.
- Tap directly on your subject’s eye. IPhoto detects the flaw and fixes the image.
4. Remove blemishes
- Select a photo and tap the Brushes icon. A fan of art tools springs up from the bottom edge of the screen.
- Touch the Repair brush.
- Rub out the blemishes on your subject’s skin for a flawless look.
Bonus Tip:
- To make the brush smaller, pinch to zoom on your photo before using the brush.
5. Brighten (or darken) photos
Adjust the whole picture:
- Select a photo and tap the Exposure button.
- Touch the part of the image that you want to adjust. IPhoto automatically senses if you’re touching shadows or highlights and adjusts the bright and dark areas accordingly when you drag your finger up or down.
- Touch the image and drag side to side to adjust contrast.
- Alternatively, touch the sliders along the bottom edge to adjust the photo with more precision. The outermost sliders adjust shadows and highlights, the inner sliders tweak contrast, and the center slider fine-tunes the brightness of the whole picture.
Adjust part of the picture:
- Select a photo and tap Brushes. A fan of art tools springs up from the bottom edge of the screen.
- Tap on the third, fourth, fifth or sixth brush, depending on what you need to accomplish. In sequence, these brushes are labeled Saturate, Desaturate, Lighten and Darken.
- Choose a brush and touch the relevant parts of the image to apply the effect. Generally, you can keep rubbing the same spot to build up the effect of an individual brush.
- Pinch to zoom on your photo before using the brush to give yourself finer control over adjustments.
- Turn on Edge Detection by tapping the icon in the lower right (beside the Eraser). This helps you apply adjustments without unwanted bleeding of brushstrokes.
- Use Eraser on the lower left to spot-erase brush effects.
6. Add Instagram-like effects
- Tap the Special Effects icon in the lower left to access professional-grade effects.
- Tap once more on the hinge of the Swatch Book to make six professional-grade filters fan out: Artistic, Vintage, Aura, Black & White, Duotone and Warm & Cool.
- Select an effect, then tap or drag along the strip to apply the effect.
When you’re applying a gradient:
- Swipe on the photo to adjust the placement of the gradient.
When you’re applying tilt-shift or vignette effects:
- Pinch on the photo to increase or decrease the effect’s intensity.
How to use Vignette, Grain or Sepia controls:
- These appear as dots at the end of the strip when you use the Black & White filter. Tap them to toggle on or off.
Bonus tip:
- The best way to learn what effects are available within the Swatch Book is to tap the Question Mark icon in the top menu bar. Doing so triggers labels that hover above the interface, showing what each swatch does.
7. Copy and paste effects onto other photos
- Select a photo whose effect you want to copy.
- Tap the Gear icon in the lower right.
- Touch the button labeled Copy Effect.
- Tap the photo onto which you want to transfer the desired effect.
- Alternatively, you can tap and hold several thumbnails to select multiple photos. You can also tap the Gear icon in the lower right and then tap Select Multiple....
- Tap Done after your selections are made from the grid of thumbnails.
- Tap the Gear icon again. Select “Paste exposure, color and effect.”
8. Undo edits
Undo all edits on a photo:
- Select an edited photo which you want to revert back to its original state.
- Tap the Gear icon. If you don’t see the icon, tap the Edit button in the upper right corner.
- Tap the button labeled Revert To Original.
Undo specific effects on a photo:
- Select an edited photo that you want to revert to a previous state.
- Tap any of the icons in the lower right that you used to edit. A light on top of those icons will highlight that effect.
- Tap the Gear icon in the lower right.
- Tap the appropriate button to remove the edit.
Bonus tip:
- Touch the Eraser in the lower left to spot-erase brush effects.
9. Compare your edited photo against the original
Tap the Show Original icon (beside the Edit button in the upper right). An overlay of the original photo will appear on top of the edited one as long as you’re touching the icon.
10. Share photos via email, Facebook, Flickr or Twitter
- Select the photo you want to share, or tap and hold several thumbnails to select multiple photos. You can also tap the Gear icon and hit Select Multiple... . Tap Done after your selections are made from the grid of thumbnails.
- Tap the Share icon in the upper right.
- Choose the particular account where you’d like to share the photo from the drop-down menu.
- Connect iPhoto, if you haven’t already, to the account where you’re sharing the photo.
- Tap the Share button to post or send the photo(s).
11. Share photos using Beam
- Select the photo you want to share, or tap and hold several thumbnails to select multiple photos. You can also tap the Gear icon and hit Select Multiple... . Tap Done after your selections are made from the grid of thumbnails.
- Tap the Share icon in the upper right.
- Tap the Beam option from the drop-down menu.
- iPhoto detects nearby iDevices using Bluetooth or Wi-Fi, as long as both iPads have the iPhoto app open.
12. Create a Photo Journal in iPhoto
- Tap the album cover where the photos you want to include in your Photo Journal are housed.
- Choose the photos you want to include, by tapping and holding several thumbnails to select multiple photos.
- Tap the Share button in the upper menu bar and select Journal from the drop-down menu.
Photo Journal layout
- In the resulting window, you’ll see an option to create a new Journal or add photos to an existing Journal.
- Give your new Journal a name, choose a preset layout, and tap the Create Journal button below.
- To add photos to an existing Journal, tap Journal, then the name of the appropriate Journal.
- Choose how you want to add new images—to Page 1, a new page or automatically.
- Next, tap Add To Journal.
- Inside the Photo Journal interface, tap the Edit button located in the upper right.
- Tap a photo you want to move, enlarge, edit (using iPhoto) or remove from your Journal. Elements within the Photo Journal are automatically snapped to a grid, so you don’t have full rein over the arrangement of the items.
- Drag the blue handles that appear to enlarge the selected photo, or simply pinch outward to enlarge a photo (or inward, to make it smaller).
- To add a caption, tap a photo, then touch Add A Caption at the bottom. A keyboard and text box appears.
- Add other attributes to your Journal by tapping the + button in the top right. The following window lets you select from several items to add: another header, text, a note, another page, a quote, etc.
- You also can add such distinctive items as a calendar date for when the photos in the particular journal were taken, a weather widget to note what the conditions were like that day, a map to display where the photo was taken, etc.
How to publish a Photo Journal
- Tap the Edit button, then tap the Share button next to it.
- Select iCloud to publish your Photo Journal online. In the next window, toggle on Publish To iCloud. IPhoto processes your photos for optimal viewing, then generates a URL on iCloud for the Photo Journal.
- Touch the Share icon and tap either Tell A Friend or View In Safari to visit the iCloud URL.
Bonus tip:
- Before publishing, you can flip the switch on “Add to home page,” which lets visitors use the home page to view multiple journals that you made. You can then share the unique URL with friends or view it in Safari.


