For a small spreadsheet, finding and removing duplicates is as easy as selecting and deleting each additional entry. For a large data set with hundreds or even thousands of names, the ability to remove duplicate entries in a semi-automated way could potentially save you days of hunting.
Today we’re going to create a small set of data, and remove duplicate entries through Excel’s own duplicate removal tools.
- Learn how to create a Pivot Table based on Multiple Tables in Excel 2013
- Here's how to Add a Drop-Down List in Excel
- See how to use Conditional Formatting in Excel to Color-Code Specific Cells
How to remove duplicate entries in Excel
1. Open an Excel workbook, or create a new one if you want to follow along. If there’s no existing data, you’ll have to add some dummy text to try this out yourself. For the sake of this tutorial, I just made a list of artists and bands, duplicating a few names along the way.

2. Select a column (or columns) to look for duplicated data. If you’re using a large data set, I’d recommend selecting each column individually. Often times, there’s a name in a different column that’ll match the first column, but won’t be a duplicate we need to remove.

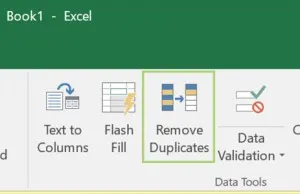
3. Open the Data tab at the top of the ribbon.

4. Find the Data Tools menu, and click Remove Duplicates.

5. Press the OK button on the pop-up to remove duplicate items from your data set.

