How to Use the PowerPoint 2013 Presenter View
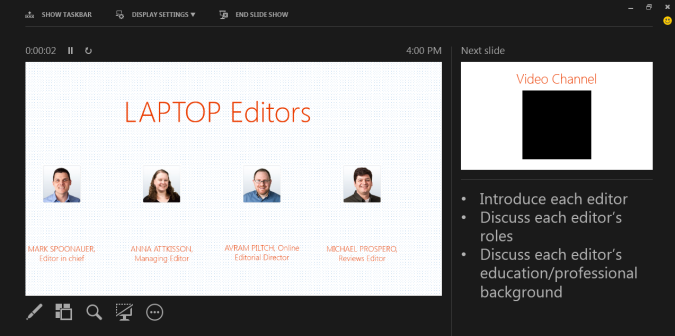
Microsoft's Presenter View is the ultimate tool to make the most of your PowerPoint 2013 presentation without disrupting the flow of the audience’s experience. The tool lets you use two monitors: one to show you what the audience is seeing, and the other to give you an enhanced set of tools.
Here's how to get started.
1. Add notes to each slide. These can serve as your script for the presentation, which stays hidden from your audience. To make your notes easier on the eyes you can click the "Make this text larger" or "Make this text smaller" icons in the bottom of your Notes panel.
2. Click Slide Show tab in the top nav bar. Make sure Use Presenter View is checked.
3. Click From Beginning to start your PowerPoint's slide show. The presentation will require two monitors. The audience will see the main presentation and you will see all the tools you'll need on the other.
4. Stay on schedule. If you watch the timer in the top left of Presenter View to see how much time in your PowerPoint 2013 has elapsed.
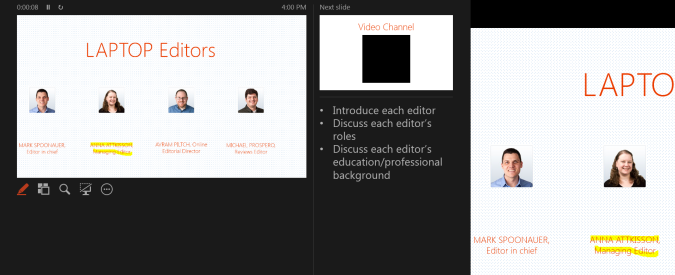
5. Highlight specific points. Click the “Pen and laser pointing tools” icon on the left directly below your slide to text on a slide. You can use this tool to write notes directly on a slide with the Pen tool during a presentation or erase notes you make on your slide with the Eraser tool.
Sign up to receive The Snapshot, a free special dispatch from Laptop Mag, in your inbox.
6. Click the See All Slides icon, second from the left under your slide. This allows you to see all of your slides in a sleek grid view at any point in your presentation. That way, if you've just presented your audience with an interesting graphic and you want to sneak a peek at the slides coming next to prepare, you can view all your slides without the audience knowing you ever left the slide they're viewing.
7. Click “Black or unblack slide show” to do just that. Blacking out the final slide can be a good end of presentation signal.
More PowerPoint Tips:
- How to Customize Your PowerPoint Presentation
- How to Use PowerPoint's Slide Zoom
- How to Collaborate Using PowerPoint
- How to Integrate Multimedia Into PowerPoint
- How to Merge Shapes in PowerPoint
- How to Add Audio to PowerPoint
- How to Use PowerPoint's Eyedropper Tool
- How to Use PowerPoint's Smart Guides
- How to Present a PowerPoint Presentation Online
