How to Perform a System Restore on Windows 8
Sign up to receive The Snapshot, a free special dispatch from Laptop Mag, in your inbox.
You are now subscribed
Your newsletter sign-up was successful
So, something’s gone wrong. That’s fine. No need to sound the alarms, toss your computer in the trash, and pull out your credit card for a new desktop or laptop purchase. There might be a way to fix up your ailing PC without you having to start from scratch with a fresh Windows 8.1 installation. That’s assuming, of course, that you haven’t turned off Windows’ powerful System Restore functionality.
System Restore isn’t perfect, nor is it a time machine. It’s not going to return your system to a picture-perfect state as of a particular date. Rather, System Restore’s “restore points” will capture your system files and system settings on a weekly basis (automatically!) or whenever you perform a “significant system event,” as Microsoft describes — whenever you install a new program or device driver, or whenever a Windows update goes through, to name a few examples. It’s not the thing to use when you need to recover a deleted personal file; System Restore doesn’t “save” those, for lack of a better way to phrase it.
So how, then, do you go about taking your system back in time to when these restore points were created?
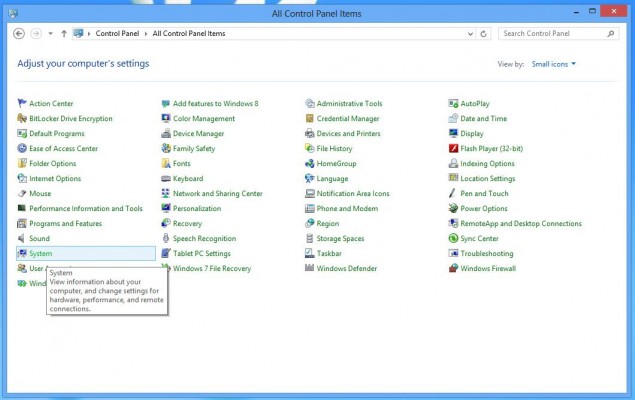
1. Pull up the System Restore screen by going to Windows 8’s Control Panel (type Control Panel on the Start Screen and click the related link). Once you’re there, click on the System icon. If you don’t see the icon, you might be in the Control Panel’s category view. Click on the button that says that and select either “large” or “small” icons.
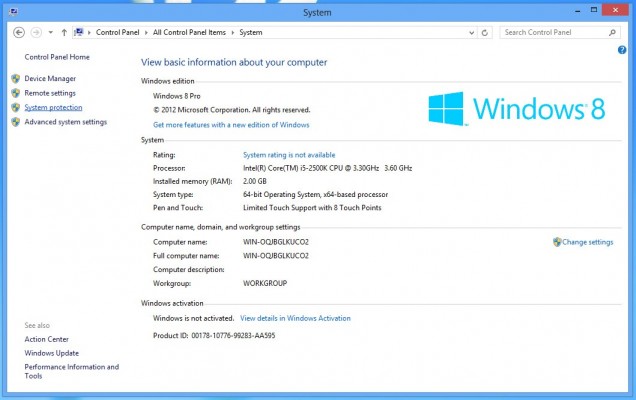
2. Click on the System Protection option on the left sidebar. Doing so should pull up Windows’ trusty System Restore screen.
MORE: 5 Windows 8.1 Start Menu Apps
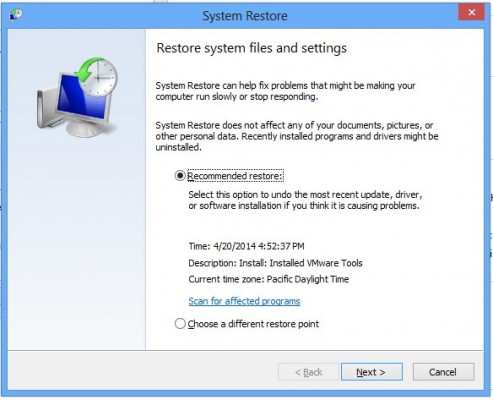
3. Click on the System Restore button. When you do, you’ll be given one of two options: You can perform a restore from a point that Windows 8 has selected for you or you can select a restore point from a list of all that are available. Make your selection and click Next.
Sign up to receive The Snapshot, a free special dispatch from Laptop Mag, in your inbox.
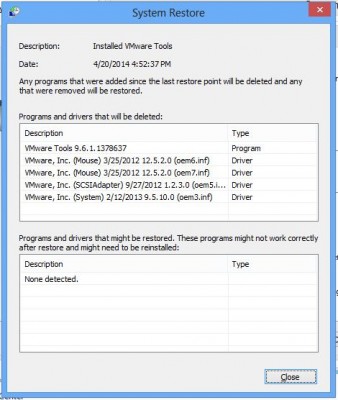
4. Check to see what programs and drivers will be affected by your restore. It’s a step that’s worth doing, just so you can make sure that you’re not going to be losing anything unintended (and if you are, you can use this step to make a note of it for when the restore is finished and you have to repeat your work). Click on the “Scan for affected programs” link (or button) and wait for Windows to fill out your list.
5. Restore away. Ready, set, go: Click on Finish to get your restore started (once you click Yes on the final Are You Sure prompt.) Best of luck to your system-fixing.
NOTE: You have the power to create restore points whenever you want. You just have to access the System Restore screen by going to System in the Windows Control Panel, clicking System Protection, and clicking the big Create button toward the bottom-right.


