Hands-On: How To Use Facebook's Newest Features
Sign up to receive The Snapshot, a free special dispatch from Laptop Mag, in your inbox.
You are now subscribed
Your newsletter sign-up was successful
Yesterday, we were pleasantly surprised when Facebook CEO Mark Zuckerberg took the stage at a press conference not to announce yet another face lift for the site, but rather, three new features designed to make the site more transparent, and to give users more control over who and what can access their information. Although Zuckerberg insists the company didn't develop these features on the heels of mounting wariness from users, it's nice to know it's been focusing on privacy nonetheless.
In case it's not obvious (and we don't think it is), here's how you can actually take advantage of these features, which include Groups for group chats and e-mails; a "Download Your Information" button to see what information about you Facebook has stored; and an applications dashboard to let you see which apps are accessing your information, and how recently. Note: not all features will be live for every user yet.
Groups
Groups has such great potential as a way of letting people to small groups of people instead of broadcasting information to an eclectic group of hundreds of friends. The problem is, Facebook makes it easier to find the older kind of groups. You know, the ones you joined before Pages and the ability to "Like" artists and organizations and businesses took off. If you click on Groups in the left-hand pane of Facebook's home page, that's exactly what you'll get. (What a way, by the by, for me to remember that I once joined a group commemorating a Mean Girls-themed party I attended in college!)
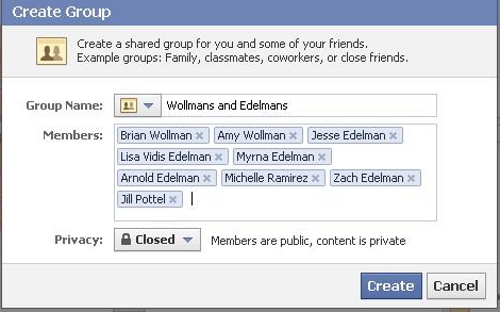
Instead, go to Facebook.com/groups to get started. Click "Create Group" to get started, and then, when prompted, create a name for the Group, add members (their names will autocomplete), and click "Create." By definition, only members of a Group can see content posted for its members. By default, the group is closed, but you can opt to make it open or secret instead.
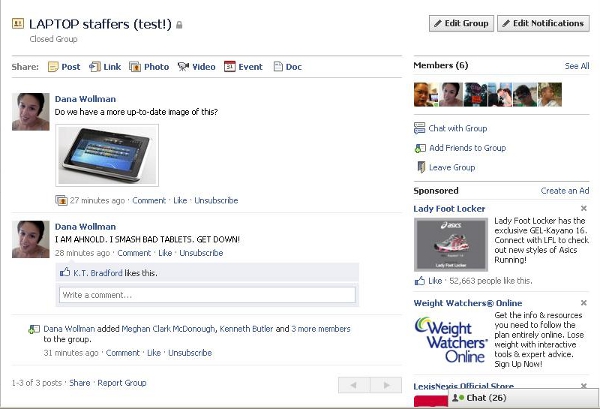
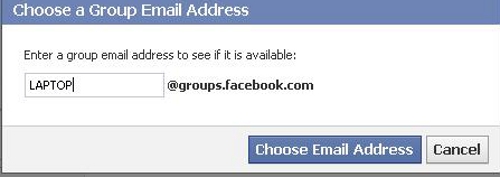
Once the Group is live, its page works the same way an individual person's wall does: you can post comments, photos, videos, et cetera. You can also initiate a group chat with whoever's online using a link on the right side of the page. You can also click Edit Group to add members, and create a "@groups.Facebook.com" e-mail address for your group so that people don't have to log into Facebook to write to one another. You'll have to remind yourself that while things you post for your Group to see will appear in your news feed, the other members are still the only other people who can see them.
One thing we'd change: there's no clear-cut way to return to the Group's page (returning to Facebook.com/groups doesn't cut it.) You can go to the home page and click on Groups, but that's confusing since that's not the same place where you go to create a Group. Just saying, Facebook.
Sign up to receive The Snapshot, a free special dispatch from Laptop Mag, in your inbox.
Download Your Information
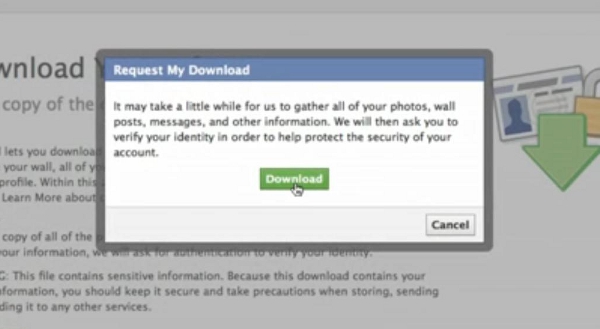
This one's easy: just to go to Account Settings, scroll toward the bottom of the page, and look for the category "Download Your Information." You'll be asked to re-enter your password, and will be warned that the download could take awhile. All of that information will download to your computer as a Zip file, which you can open in your browser. Note that that page will look like a simplified version of your Facebook page; click on a Photos link on the left-hand side, for instance, to see information about all of your photos in one place.
Applications Dashboard
To see what applications you use (and what information from your Facebook profile it has access to) go to Account > Privacy Settings > "Edit your settings" (look for a link in the lower left-hand corner of the page). Then, you'll see a page with the header "Applications you use" at the top.
If the feature is live for you, you'll see a list of applications, and for each one, you'll see what categories of information from your Facebook profile it can see (say, basic information) as well as the last time a given app used any of this information. You can even click "details" to see what information it used. (Lesson learned: an app doesn't necessarily use all information it has access to every time you use the app.) The dashboard is also a good place from which to remove apps, if you don't use them anymore or are disturbed by just how much its developers know about you.
Dana Wollman was a contributing writer at Laptop Mag. Her coverage included reviews of some of the most iconic laptops from the previous decade, such as the Dell XPS, Dell Studio, HP EliteBook, and MSI Wind. She focused on smaller netbooks and productivity-oriented devices. After Laptop Mag, Dana worked as an Editor-in-Chief at Engadget, and is now a Senior Technology Editor at Bloomberg.


