Use Snow Leopard to Turn Your Mac into a DVR
Snow Leopard's QuickTime X upgrade includes an innovative feature: screen recording. Several reviewers have utilized the function to show off what the new OS is capable of, but we quickly hit on a much more entertaining use: QuickTime as DVR. With the screen recorder, you can capture not just the UI, but also internal sound and moving video at full screen. (Yes, that includes Hulu.) And then you can easily take that file and move it your iPhone.
There are some drawbacks, of course, and true aficionados who want DVD-quality video for their permanent collections will probably pass. But if you want to watch an episode of your favorite show from Hulu on your iPhone or iPod, this is a good solution. Here's how to do it.
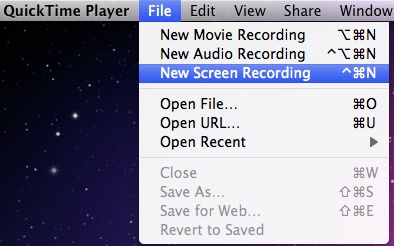
First, find the video you want to record and queue it up. Also make sure the system volume is set to your desired level. 50 - 100% works best. Next, open QuickTime and go to File > New Screen Recording.
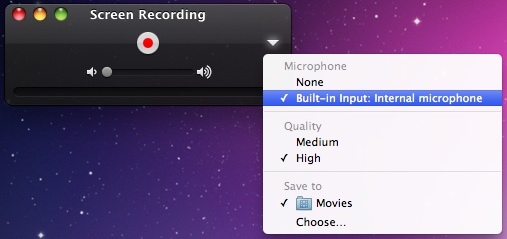
This will bring up the Screen Recording Dialogue box. Be sure that the volume slider is all the way to low, since the higher you set it, the more background noise the mic will pick up. Click the arrow on the right to bring up the settings dialogue and make sure "Built-in Input" is selected.
Click the Record button to begin. Go to the video you want to capture, make it full-screen, then press start. The screen recorder will take care of the rest.
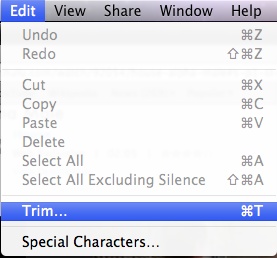
Once you're done recording, press the stop button (on the upper toolbar). Your movie is automatically saved. From here you can trim the file to remove the few seconds of mouse movement from the beginning and end. Just go to Edit > Trim.
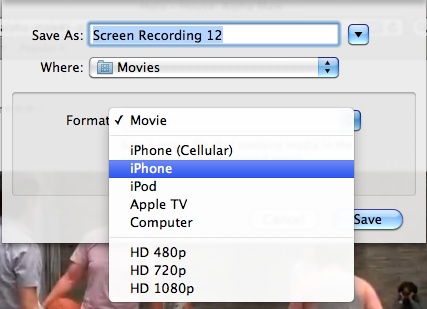
Next, save your file. In the save dialog box you have several choices, including 3 HD options and iPod and iPhone optimized formats.
Sign up to receive The Snapshot, a free special dispatch from Laptop Mag, in your inbox.
As I mentioned, there are some drawbacks to using this QuickTime X as a poor man's DVR. The main issue is that the MacBook's mic not only picks up the audio from the video source but also external sound. We haven't yet figured out a way to get around this (choosing None in the Screen Recording settings dialog resulted in no sound whatsoever). Members on the Apple support forum suggest using SoundFlower to get around this. Results may vary, but it's worth a try. You could also just leave your laptop in a quiet room while it records -- you won't be using it for other tasks with this method, anyway.
The video quality isn't the best, but is certainly good enough for casual viewing, particularly on a smaller screen.
Is it worth the hassle? Only you can decide. But imagine if Apple rolled out the ability to time screen recordings so you didn't have to manually stop it. Then things would get even more interesting.
To see how video looks with this method, check out the screen recording of our tutorial below.
[flq:8c21124272f140dcac35893af05c2e13]
This tip is featured on "Into Tomorrow ...with Dave Graveline", airing this week!
K. T. Bradford writes about laptops, apps, and ebook readers for Laptop Mag. She has written reviews of some of the most iconic laptops from the last decade and more, covering models such as the Acer Aspire One, the Samsung R580, and the Lenovo IdeaPad S205. Some of her other reviews include MSI, HP, Dell, and Asus notebooks.
