
How do I reduce the file size of a video? How can I compress a video without losing quality? There are so many APP solutions to compress videos in the market, but it still troubles somebody that most APPs cannot satisfy both high-speed and high-quality. Some compression programs are efficient, but take too much time to complete the process while others are fast but produce low-quality outputs. There are a few others that are both fast with decent picture quality but do not support a variety of file formats, and therefore can’t be used in every situation.
Keeping those issues in mind, Wondershare came up with a robust tool called Wondershare UniConverter. UniConvertor stands out not only for its intuitive UI but also its outstanding compression features, including but not limited to compress videos in most formats in batch without any quality loss, high-speed compression, accurately estimates the size of the compressed file, etc.. Its attractive features are as follows:
- Support over 1,000 video and audio formats and even support compress DVD files for backup, sharing, or playback, which surpass most video compressors in the market.
- Support compression of very large files without crashing, compress up to 8k videos quickly with easy one click.
- Capable of compressing any format videos with negligible quality loss in super-fast compression speed.
With UniConverter, you can compress large video files in three simple steps. Just follow the following instructions:
Step 1: Import a Large Video File
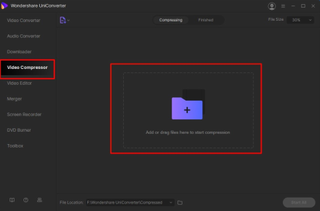
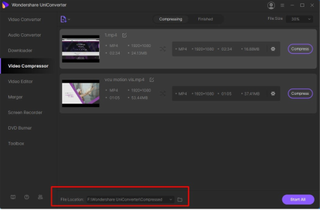
After installing Wondershare UniConverter on a computer (an Intel-based laptop running Windows 10 is used here for illustrations), launch the program, select the Video Compressor category from the list in the left menu pane. Next, click the Add Files icon from the center of the right window, select and import the video clip using the Open box that appears.
Step 2: Set Up Compression Preferences
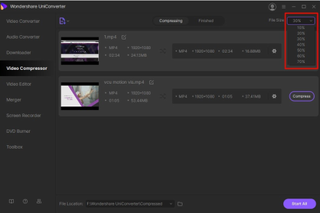
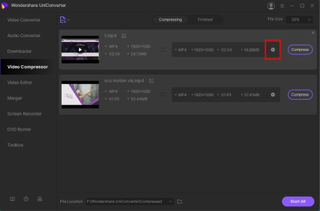
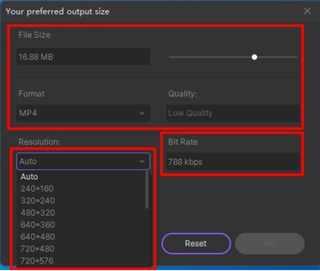
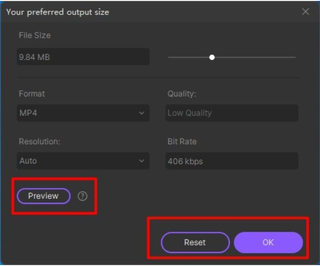
Choose a suitable compression ratio from the File Size drop-down list present at the upper-right corner of the interface (default is 30%). Alternatively, click the Settings (Gear) icon from the right side of the video file that was imported in the previous step. From there, use the slider and the available drop-down lists on the Your preferred output size box that opens up to set the compression preferences more granularly. Next, click Preview to check if the output quality is acceptable, and click OK to save the new settings.
Step 3: Compress Video with High Quality
Back on the main window, choose an output folder in the File Location field from the bottom, and click Compress from the right end of the video.
Note: In case of having multiple files, the users need to click Start All from the bottom-right corner of the interface to perform batch compression.
Note: The compression ratio for all the imported files must be configured individually as per the method explained earlier unless the File Size drop-down list is being used to select a global reduction percentage, i.e. for all the media clips in the list.
It is also worth mentioning here that Wondershare UniConverter is capable of compressing large video files with no or very negligible picture quality loss. Since the compression ratio can be set pretty granularly using the drop-down lists, options, and the slider, the produced files occupy less amount of disk space, thus enabling users to save more data on their storage device.
Furthermore, UniConverter provides additional features to help you personalize and customize the compressed files. Whether before or after the process of compression, you can trim and crop the videos, also can apply effects, add subtitles, adjust the built-in audio, and add your watermark to the video files. What’s more, UniConverter allows transferring the processed videos easily and quickly to a range of devices like iOS, Android smartphone, external hard drive, and others.
UniConverter has been in the market for over 10 years. It was previously known as Wondershare Video Converter Ultimate. As the technology evolved, the developers added several new features to the application, and the software gradually grew into a full-fledged post-production tool that is now distributed under the name of Wondershare UniConverter. The app is now used by many professionals and newbies across the globe.
Wondershare UniConverter also has a dedicated customer support team available 24/7 to provide troubleshooting assistance to its customers. Those experiencing issues can contact support personnel either from within the UniConverter’s interface itself, or post their issues or concerns on the software’s official Facebook page https://www.facebook.com/wssharevideoconverter/, and someone from the department will reply within 60 minutes of posting the query.
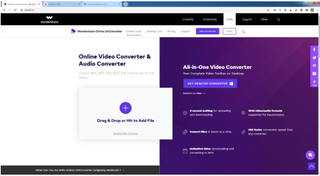
If you’d rather not install a dedicated application on your computer, there’s also an online version of UniConverter. The free online tool, dubbed Wondershare Online UniConverter, can be accessed directly via an Internet browser without installing any program on the PC. Go to Wondershare Online UniConverter to enjoy the online video conversion and compression now.
Stay in the know with Laptop Mag
Get our in-depth reviews, helpful tips, great deals, and the biggest news stories delivered to your inbox.
